Azure Active Directory (Azure AD) is Microsoft’s multi-tenant cloud based directory and identity management service.
For application developers, Azure AD lets you focus on building your application by making it fast and simple to integrate with a world class identity management solution used by millions of organizations around the world.
I use Offer Management UI - a Microsoft project that I have done to show you the result.
The AAD was implemented successfully, if users want to use Offer Management UI, they need to be add to Azure directory and Group (in size AD).
They can
belong many groups, one of their group should be allowed for the particular Element
(Controller/Menu/API).
1. Define
access control: This is a demo for access control table, we can list all
elements in our tool and set the right access on each group. User must belong
at least one group has checking (X) to access to an element.
Current
group in our AD
|
|||
Group
|
Observer
|
Editor
|
Admin
|
Demo Email
|
centric.observer
@outlook.com
|
centric.editor
@outlook.com
|
centric.Adm
@outlook.com
|
Control
|
|||
Home
|
X
|
X
|
X
|
Help
|
X
|
X
|
X
|
View
|
|||
Offer
|
X
|
X
|
X
|
Inventory
|
X
|
X
|
|
Offer
Type
|
X
|
||
Offer
Scenario
|
X
|
||
Model (API)
|
|||
Offer
- Read
|
X
|
X
|
X
|
Offer
- Create
|
X
|
X
|
|
Offer
- Deactive
|
X
|
X
|
|
Inventory
– Read Blob
|
X
|
X
|
|
Inventory
– Upload Blob
|
X
|
||
Inventory
– Delete Blob
|
X
|
||
Inventory
– Add to Inventory
|
X
|
||
Queue
Graph – Load Graph
|
X
|
X
|
|
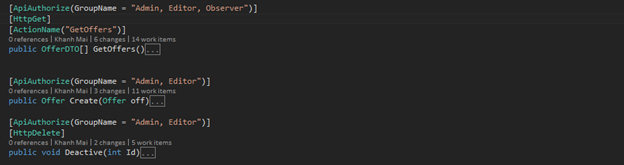
2. Easy to use: Developer can easy to set the right access to each group in each element.
-
Controller

-
View
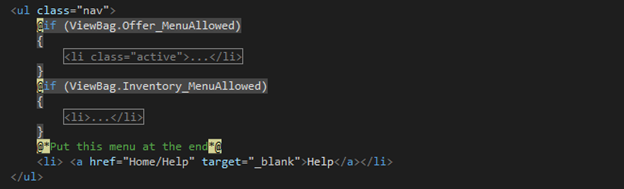
-
API
API
3. Demo